Wrangling Wide Cells: Mastering Excel's Auto-Size Column Feature
Ever feel like you're wrestling with a giant spreadsheet octopus, its data tentacles spilling out of their cells and making a mess of your carefully crafted layout? Taming those unwieldy columns is key to a clean and efficient spreadsheet, and that's where Excel's auto-size feature comes in. It's like having a tiny, highly trained formatting ninja at your disposal, ready to perfectly tailor each column to its contents.
Imagine a world without this feature. You'd be manually dragging each column border, painstakingly adjusting the width until every last character is visible. Talk about a time suck! Excel auto-sizing eliminates this tedious chore, freeing you to focus on what really matters – analyzing your data and extracting meaningful insights.
The auto-size column feature allows Excel to dynamically adjust column widths based on the longest text string within each column. No more truncated words or hidden data – just a perfectly fitted presentation. It's a seemingly simple feature, but one that can dramatically enhance the readability and usability of your spreadsheets.
This feature has been around for quite some time, becoming a staple in spreadsheet software since the early days of electronic spreadsheets. As spreadsheets transitioned from paper ledgers to digital platforms, the need for dynamic formatting became clear. The ability to automatically adjust column widths based on content was a natural evolution, significantly boosting efficiency.
But why is this seemingly mundane feature so important? Clear data presentation is crucial for effective data analysis. If you can't easily see your data, you're more likely to make mistakes and miss critical insights. Auto-sizing ensures that all your data is visible at a glance, promoting accuracy and faster analysis. Plus, it makes your spreadsheets look professional and well-organized, a real bonus when sharing your work with others.
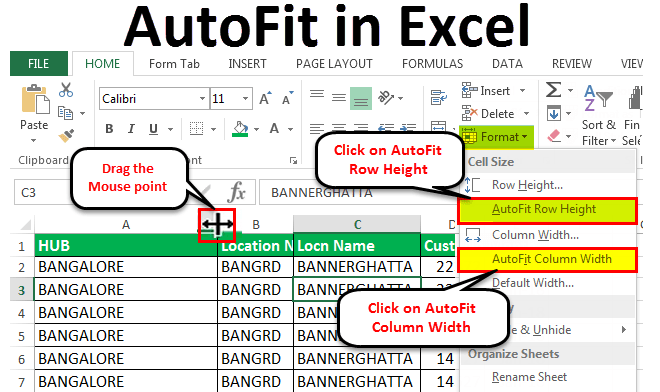
The core functionality of Excel's auto-size feature is straightforward. It scans each cell within a column, identifies the longest text string, and adjusts the column width accordingly. You can either auto-size individual columns by double-clicking the right border of the column header or auto-size multiple columns by selecting them and then double-clicking the right border of any of the selected column headers.
Auto-sizing offers several distinct advantages. Firstly, it saves you time and effort by automating a tedious formatting task. Secondly, it improves data visibility, reducing the risk of errors. Finally, it enhances the overall presentation of your spreadsheets, making them more professional and easier to understand.
Benefits of Excel Auto-Size Columns:
1. Enhanced Readability: No more squinting to decipher truncated text. Auto-sizing ensures all data is clearly visible.
2. Time Savings: Automate the resizing process and reclaim valuable time for more important tasks.
3. Professional Presentation: Create polished and well-organized spreadsheets that impress colleagues and clients.
Step-by-Step Guide to Auto-Sizing Columns in Excel:
1. Select the column(s) you want to auto-size.
2. Double-click the right border of any of the selected column headers.
Advantages and Disadvantages of Excel Auto-Size Columns
| Advantages | Disadvantages |
|---|---|
| Saves Time | Can sometimes be too wide if there's one unusually long entry |
| Improves Readability | Doesn't account for wrapped text within a cell |
| Enhances Presentation | Can make the spreadsheet harder to navigate if columns become excessively wide |
Best Practices:
1. Use auto-sizing after data entry to ensure accurate adjustments.
2. Consider manual adjustments for wrapped text or unusually long entries.
3. Use conditional formatting to highlight key data even after auto-sizing.
4. Test different font sizes to optimize readability after auto-sizing.
5. Regularly use auto-sizing to maintain a clean and organized spreadsheet.
Frequently Asked Questions:
1. How do I auto-size all columns in a worksheet? Select all columns by clicking the blank rectangle at the intersection of row and column headers. Then, double-click the right border of any column header.
2. Can I undo auto-sizing? Yes, press Ctrl+Z (or Cmd+Z on a Mac) to undo the auto-sizing.
3. Does auto-sizing work with merged cells? Yes, but the column width will be based on the content of the merged cell.
4. Can I auto-size rows too? Yes, the same principle applies to rows. Double-click the bottom border of a row header to auto-size it.
5. Why isn't my column auto-sizing correctly? This could be due to hidden characters or formatting issues. Try clearing formatting or checking for hidden characters.
6. How do I prevent auto-sizing from making columns too wide? Manually adjust the column width after auto-sizing or consider using a smaller font size.
7. Can I auto-size columns in other spreadsheet programs? Yes, most spreadsheet software offers similar functionality.
8. Does auto-sizing affect formulas? No, auto-sizing only changes the visual presentation of the data, not the underlying formulas.
Tips and Tricks:
Use the "AutoFit Column Width" option in the Format menu for more precise control over auto-sizing. This allows you to set a maximum column width or adjust the sizing based on specific cell contents.
Mastering the art of Excel's auto-size columns is a small but powerful step towards spreadsheet mastery. It's a simple yet effective way to improve data visibility, save valuable time, and create professionally formatted spreadsheets. By understanding the nuances of this feature and implementing the best practices outlined above, you can unlock a new level of efficiency and streamline your data analysis workflow. Don't let unruly columns control your spreadsheet destiny – embrace the power of auto-sizing and unleash the full potential of your data. Remember, clean data leads to clear insights, and that's what truly empowers you to make informed decisions. So, take control of your spreadsheets, one perfectly sized column at a time, and watch your productivity soar.
The enduring allure of the navy blue notebook
Ohana means family exploring the stitch silhouette phenomenon
Bastogne exploring its location and significance


