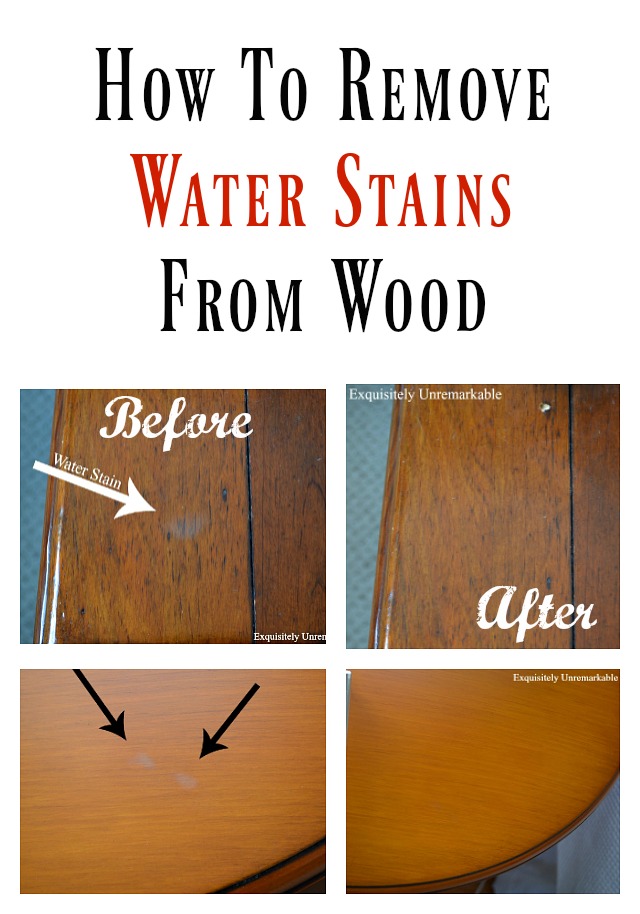
Vanquishing Water Rings: Wood Rescue 101
Ugh, that dreaded white ring. You know, the one staring back at you from your beautiful antique table, a stark reminder of that ill-fated coaster-less cocktail night. Water marks on wood are a common enemy of pristine furniture, but thankfully, not an unbeatable one. This guide is your battle plan for banishing those blemishes and reclaiming your wood's former glory.
Water marks, or water rings as they’re often called, are caused by moisture penetrating the wood's finish. This trapped moisture clouds the finish, creating that telltale whitish haze. While it might seem like the wood itself is stained, it's often just a superficial issue residing in the finish. This means with the right approach, you can usually erase these watery woes.
The struggle against water marks on wood is likely as old as finished wood itself. From the earliest polished tables to today's sleek modern designs, that pesky ring has been a persistent problem. The importance of knowing how to eliminate water marks is tied directly to the value we place on our wooden possessions. Whether it's a cherished heirloom or a contemporary piece, keeping our wood looking its best is a priority.
There's a multitude of supposed remedies floating around, from the bizarre (mayonnaise, anyone?) to the practical. The biggest issue in tackling water marks is figuring out the severity of the damage. A light ring might respond to a simple buffing, while a deeper mark could require more intensive treatment. Misdiagnosing the problem can lead to wasted effort, or worse, further damage to the finish.
Eliminating water marks isn't just about aesthetics; it's about preservation. By addressing water damage promptly, you prevent further penetration that could warp or weaken the wood. So, understanding the nuances of water mark removal is crucial for maintaining the integrity and longevity of your wooden pieces.
One simple approach is the gentle heat method. Use a clean, dry cloth and a low-heat iron to gently warm the affected area. The heat can help evaporate the trapped moisture. Another popular remedy involves using a paste made from baking soda and toothpaste. Apply the paste, let it sit, and then gently buff it off.
Removing water marks revitalizes the appearance of your furniture, increasing its aesthetic appeal. It also preserves the value of antique or high-quality wooden pieces. Finally, learning these techniques empowers you to take care of your belongings, fostering a sense of accomplishment and satisfaction.
Action Plan:
1. Assess the damage: Determine the severity of the water mark.
2. Choose a method: Select an appropriate technique based on the severity.
3. Test in an inconspicuous area: Always test your chosen method on a hidden part of the furniture first.
4. Apply the chosen method: Carefully follow the instructions for your selected technique.
5. Evaluate the results: Check if the water mark has been removed. Repeat if necessary.
Advantages and Disadvantages of Different Methods
| Method | Advantages | Disadvantages |
|---|---|---|
| Ironing | Quick, often effective for light marks | Can damage delicate finishes if too hot |
| Baking soda paste | Gentle, readily available ingredients | May require multiple applications for stubborn marks |
FAQs:
1. Can I use mayonnaise to remove water marks? While some swear by it, it's messy and can leave an oily residue.
2. What about commercial water mark removers? They can be effective, but always test in an inconspicuous area first.
3. How can I prevent water marks? Use coasters! And wipe up spills immediately.
Tips and Tricks: Always work in a well-ventilated area. Never use excessive force when buffing. Patience is key – sometimes multiple applications are needed.
In conclusion, removing water marks from wood doesn't have to be a daunting task. Armed with the knowledge and techniques outlined in this guide, you can confidently tackle those pesky rings and restore your wood furniture to its former glory. Understanding the causes, assessing the damage, and choosing the right approach are crucial steps in the process. By taking proactive measures and learning effective removal methods, you can preserve the beauty and value of your wooden treasures for years to come. This not only enhances the aesthetic appeal of your home but also provides a sense of satisfaction in knowing you can care for your cherished possessions. So, grab your supplies, put on your DIY hat, and get ready to banish those water marks for good!
Unlocking modesto your guide to full time rn careers
Cartoon characters with afros a celebration of style and substance
Crafting the perfect return to work message a deep dive


:max_bytes(150000):strip_icc()/remove-a-water-mark-from-wood-furniture-1976384-03-f33c30fbc9074bab8e24cdc72e140d02.jpg)


:max_bytes(150000):strip_icc()/remove-a-water-mark-from-wood-furniture-1976384-03-f33c30fbc9074bab8e24cdc72e140d02.jpg)

