Decoding Car Stereo Wiring: A Guide to Standard Car Radio Wire Colors
Ever stared at a tangle of wires behind your car stereo and felt a surge of bewilderment? You're not alone. Understanding car stereo wiring can feel like deciphering an ancient language, but the key lies in understanding the standard car radio wire color codes. This seemingly small detail is the linchpin of a successful car audio installation.
Navigating the world of car audio wiring requires a basic understanding of these color conventions. These standardized hues act as a universal language, guiding you through the process of connecting your stereo to your vehicle’s electrical system. Without this knowledge, you risk damaging your equipment, or worse, creating electrical hazards.
Historically, car radio wire colors weren't always standardized. Early car audio systems often used manufacturer-specific wiring schemes, creating a chaotic landscape for installers. The need for a universal system became evident as car audio grew in popularity, leading to the adoption of the standard color codes we use today. This standardization simplified installations, reduced errors, and promoted interoperability between different car stereo brands.
The importance of adhering to these standard car radio wire color codes cannot be overstated. Correct wiring ensures the proper functioning of your car stereo and prevents damage to the unit itself, your car's electrical system, and potentially even you. Miswiring can lead to blown fuses, short circuits, and even fires. It's crucial to treat this aspect of car audio installation with the respect it deserves.
While the concept of standardized colors seems simple enough, several issues can arise. Faded or mislabeled wires, aftermarket modifications, and variations between car manufacturers can all present challenges. Therefore, it's always recommended to double-check your vehicle's wiring diagram before making any connections. A simple continuity tester can also be a lifesaver, helping you identify each wire's function accurately.
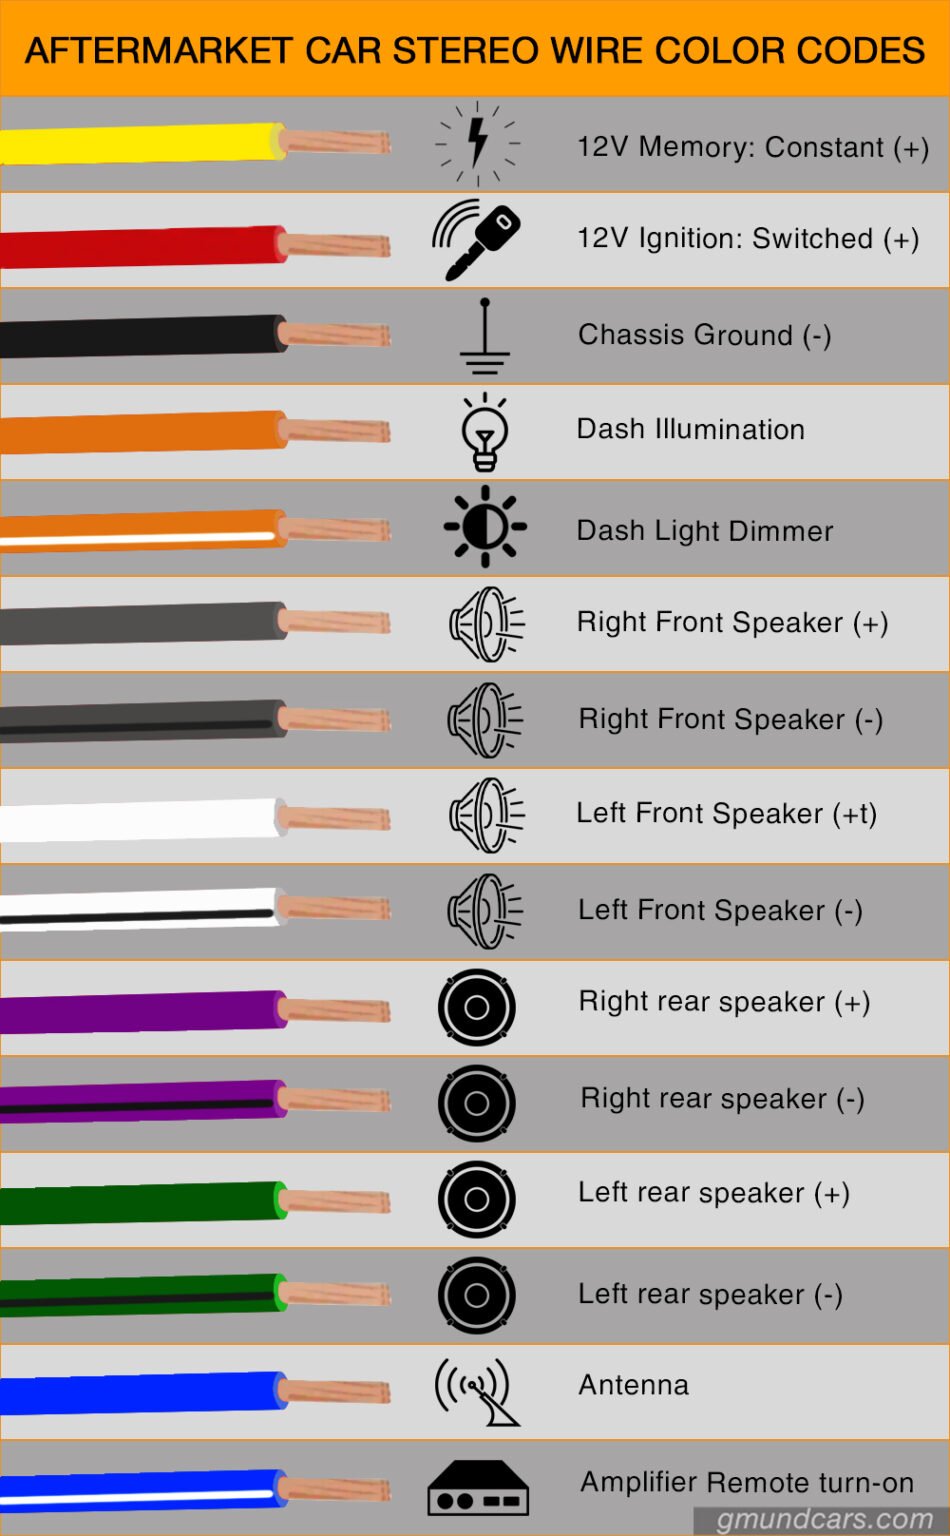
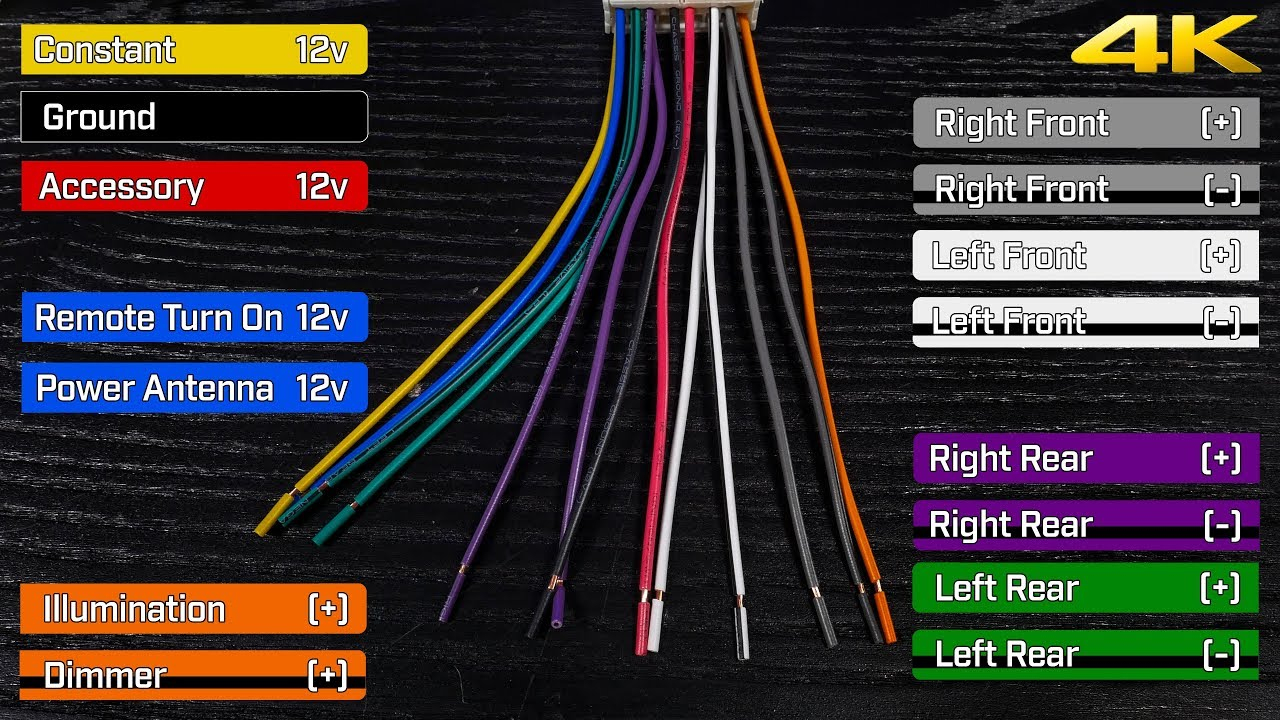
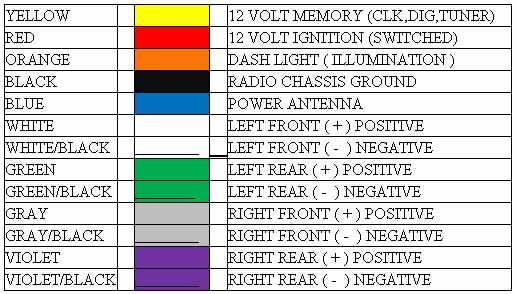
A standard automotive wire color code chart is invaluable for any car stereo installation. Key colors include: Yellow for constant 12V power, Red for switched 12V power (activated by the ignition), Black for ground, Blue for power antenna, and Orange for dimmer. These are the most common, but others exist depending on the car’s features and the stereo's capabilities.
One benefit of adhering to the standard car radio wiring color codes is the ease of installation. Knowing what each color represents simplifies the process, reducing the risk of errors. Another advantage is improved troubleshooting. If a problem arises, the standardized colors make it easier to identify the source of the issue. Finally, using the correct wire colors ensures compatibility between different car stereo brands and models.
Before starting any car stereo installation, gather your tools: wire strippers, crimpers, electrical tape, and a wiring diagram for your vehicle. Next, disconnect the negative battery terminal to prevent electrical shocks. Identify each wire using the diagram and the color code chart. Connect the corresponding wires from the stereo harness to the car's wiring, ensuring secure connections. Finally, reconnect the battery and test the stereo.
Advantages and Disadvantages of Standard Car Radio Wire Colors
| Advantages | Disadvantages |
|---|---|
| Simplified installation | Potential for confusion with aftermarket wiring |
| Easier troubleshooting | Variations between manufacturers |
| Improved compatibility | Faded or mislabeled wires can cause problems |
Best Practices: 1. Always disconnect the negative battery terminal before working on car wiring. 2. Use a wiring diagram specific to your car model. 3. Double-check all connections before powering on the stereo. 4. Use high-quality connectors and crimpers. 5. Securely insulate all connections with electrical tape.
Challenges and Solutions: 1. Faded Wires – Solution: Use a multimeter to test continuity and identify the wire’s function. 2. Aftermarket Wiring – Solution: Consult the wiring diagram for the aftermarket harness. 3. Missing Wires – Solution: Check for broken or disconnected wires behind the dashboard.
FAQ: 1. What does the yellow wire do? Provides constant 12V power. 2. What is the red wire for? Switched 12V power (activated by the ignition). 3. What if my car's wires are a different color? Consult your car’s wiring diagram.
Tips and Tricks: Use a test light to quickly identify power and ground wires. Label each wire with masking tape during the installation process.
In conclusion, understanding standard car radio wire colors is fundamental to any car audio installation. These seemingly simple color codes provide a roadmap for connecting your stereo safely and correctly. By adhering to the standard conventions, using best practices, and understanding potential challenges, you can enjoy a seamless car audio experience. While the initial task of deciphering the wires might seem daunting, the benefits of a properly installed car stereo, from crisp sound quality to enhanced entertainment features, are well worth the effort. Don't let the fear of wires hold you back – embrace the knowledge, and enjoy the rewards of a perfectly tuned car audio system. Take the time to understand the wiring, use the available resources, and if in doubt, consult a professional. Your ears will thank you.
Unveiling the chevy 3500hds towing prowess
Mastering the art of savage comebacks in hindi
Unlocking meaning exploring remember me poem analyses


